Here is some helpful information and a few guidelines to follow so that your job can be completed more quickly, easily (and so less costly), and look more like what you are aiming for.
General
- Pages/Sheets: "Pages" and "sheets" are not the same thing. A double-sided sheet has one page on its front and one on the back.
- Duplexing: There are two kinds of duplexing (double-siding). One is called "open to the left." This is the typical type of duplexing; when the sheet is flipped from the right to the left, the content on the front and the content on the back are right-side up to the viewer. The other type of duplexing is "open to the top." With "open to the top" duplexing, when the sheet is flipped from top to bottom, the content on the front and the content on the back are right side up. If an "open to the top" sheet is flipped from right to left, the content on one of the sides appears upside-down to the viewer.
- Format: Please send your documents as PDFs*. PDF stands for "Portable Document Format," which means that the layout of the file does not change even when it is sent over the internet. This ensures that the document shows up the same way for us as it does for you.
- *The exception to this recommendation is standard picture prints (8x10s, 5x7s, 4x6s, etc). Please send those in JPG format.
- Sizing: Please try to have your file sized to the dimensions you want it to be when it comes out of the printer. The more difficult it is to resize your file to the requested print size, the more we have to charge. If you need it to be resized or cut to specific dimensions, please give those measurements in inches, if possible.
- Bleed/to-the-edge printing: Our printers are unable to print all the way to the edge of the sheet. This means that they will force white borders on the prints. If your prints are sized to perfectly fit one of our paper sizes (see our "Services" page) and you are all right with a white border, we can scale your image down slightly so that none of the content is cut off and print it on that size stock. If you are not okay with the white border, there are a couple options:
- We can trim off the white by cutting into your content a bit. This only works if there is nothing important close enough to the edge that it might get trimmed off. (Please give us at least a couple tenths of an inch of tolerance.) This can be difficult to do if you need your prints to be an exact size after cutting, especially if it means we need to go up another page size.
- The better option is to use bleeds. See the section directly below.
Bleeds
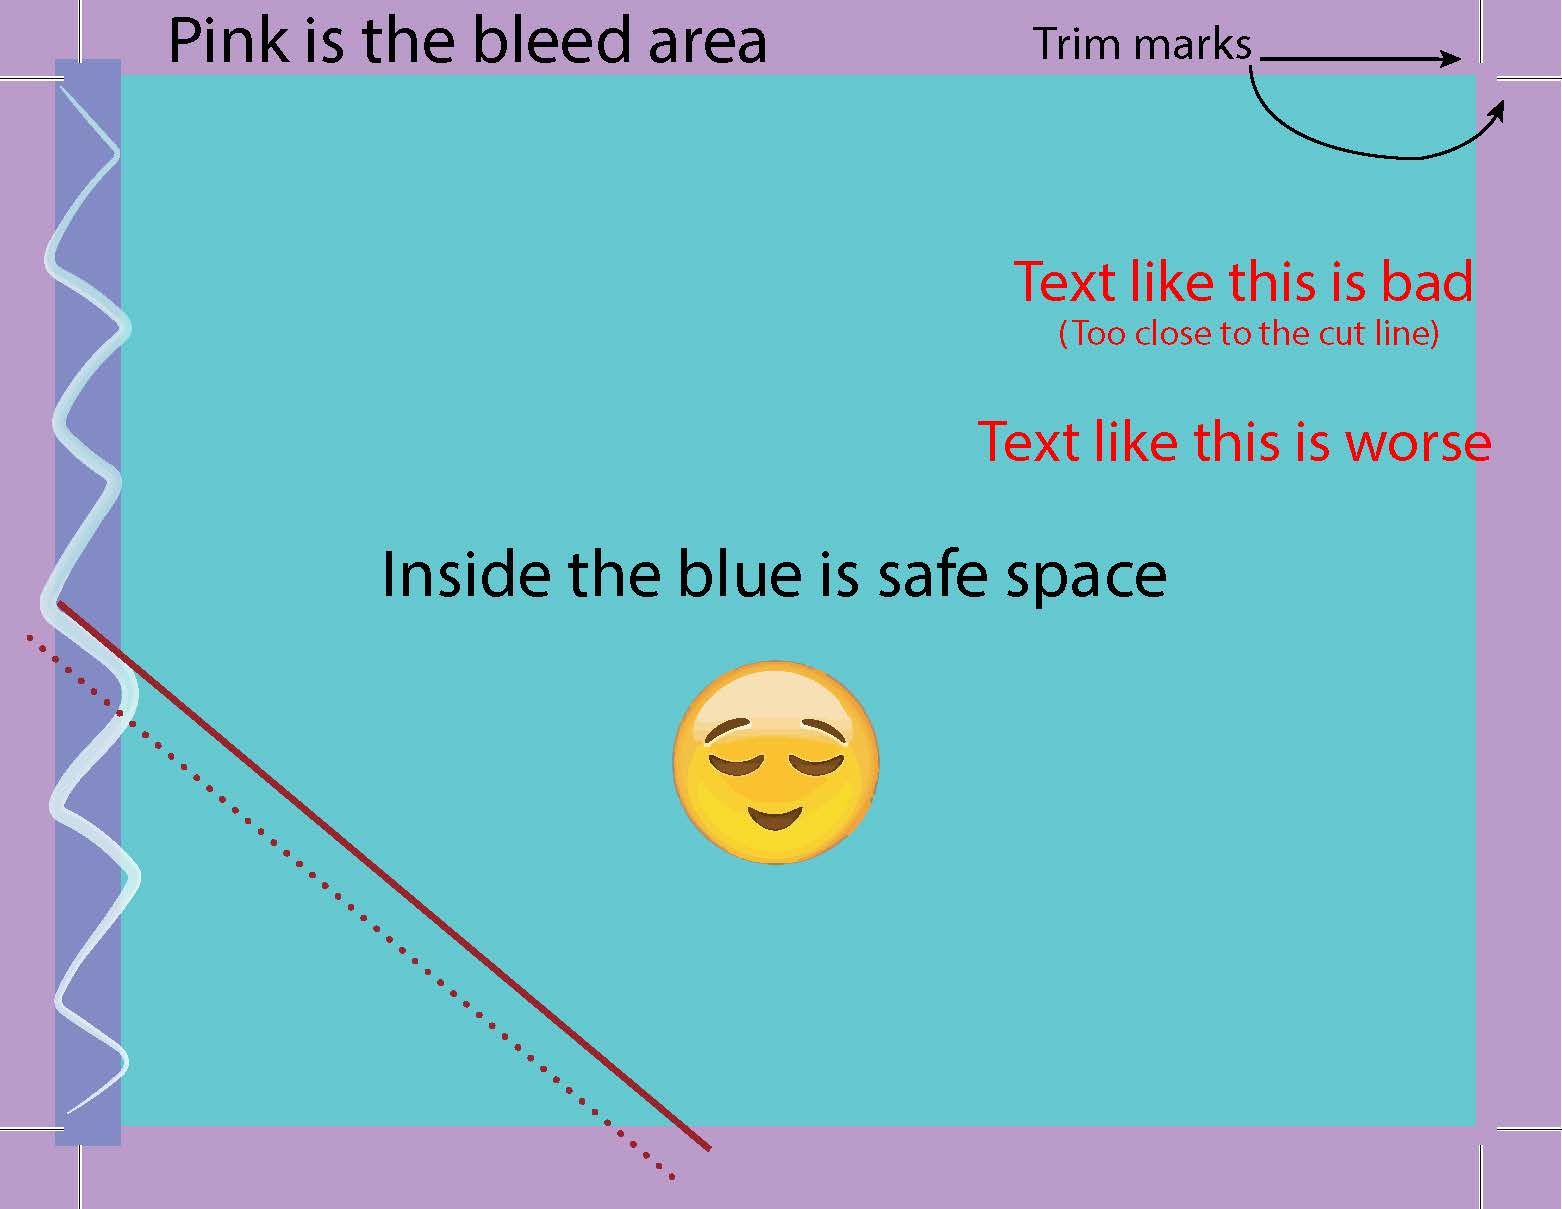
- What are bleeds?: Since most printers are unable to perform "borderless printing," bleeds allow the design of a print to "bleed" off the edge of the final printed product. A document with bleed has an inside area where the important content is placed and a bleed area surrounding it (see the first image below). The boundaries between the two are marked by trim marks (also called crop marks) that show where the document should be cut. Most of the bleed area is cut off in the end, but it gives a margin for error in print registration and trimming, enabling the design of the final product to go all the way to the edge of the paper and to be the exact size it was meant to be in the end.
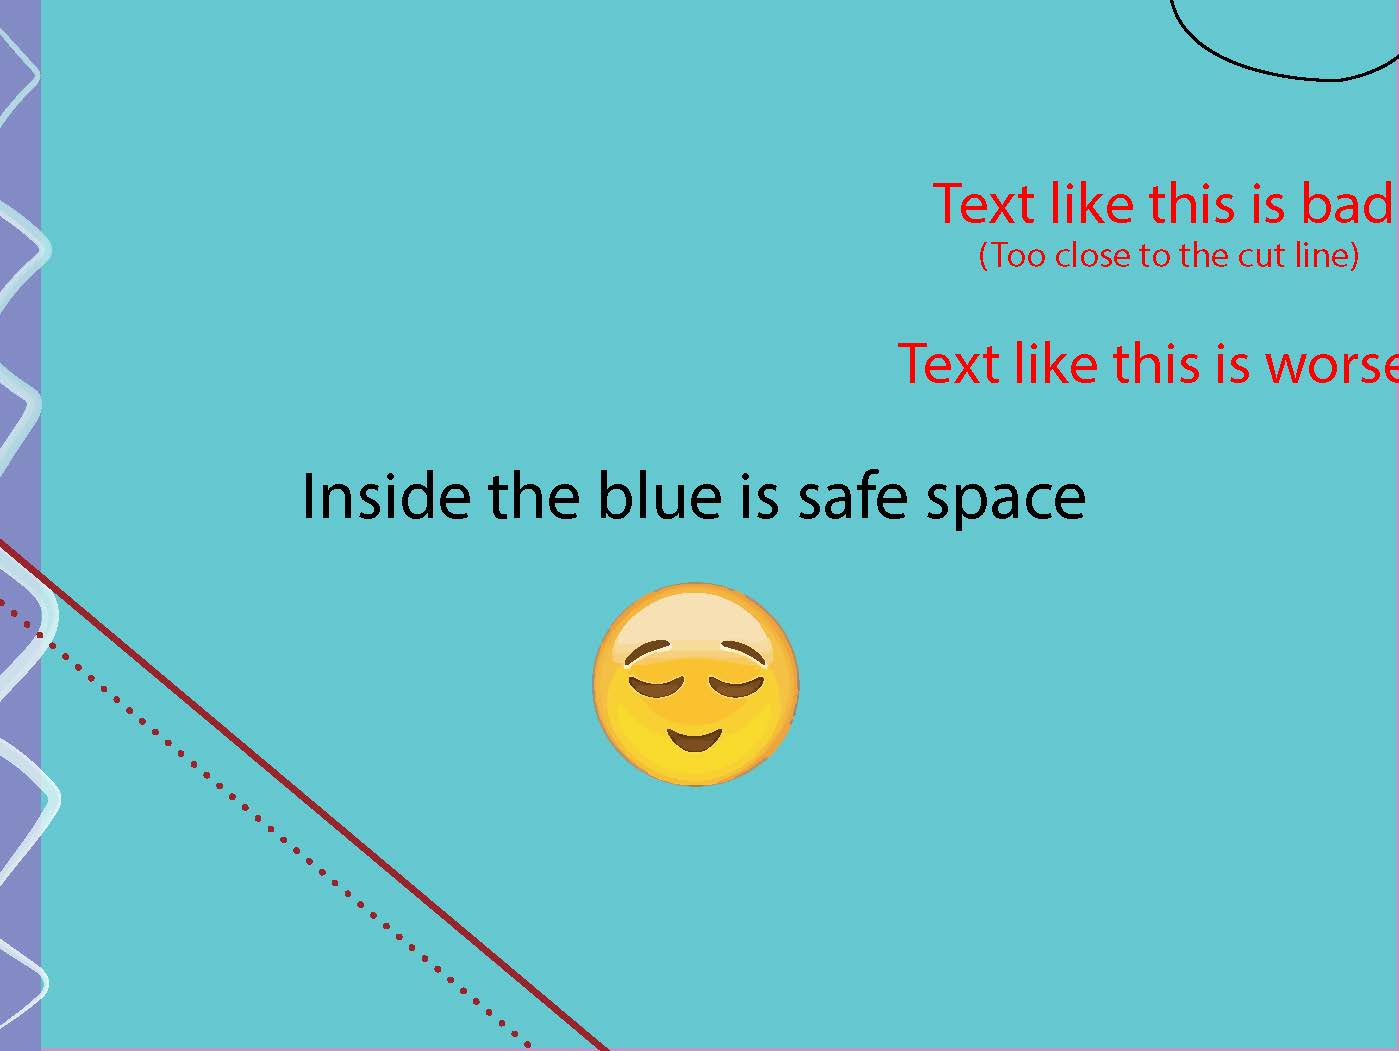
Below is what the same document would look like after trimming.
- How do I add bleeds?: Here is a PDF of directions for adding trim marks in a few applications. If you believe any of these instructions are outdated or incorrect, please send us an email to let us know.
- If you cannot get bleeds onto your document for some reason but need it cut to bleed, please at least make sure that important words/images are not too close to where the print should be cut and that colored borders are thick enough to cut into. Please give us a couple tenths of an inch or more.
Booklets
-
(See our services page for a list of binding types.)
- Pages: Please send your booklet file as a PDF of single pages - we will arrange the pages into booklet format on our end. Having single pages allows us to more easily make necessary adjustments when printing.
- Size and binding: Have your file the dimensions you want it, with bleed if applicable (see bleed section above). Please mention in your email what size you want your booklet to be and the type of binding you would like.
- Covers: Let us know if you would like your cover on cardstock, and if you want it single or double-sided. We can also put a transparent cover on coil or comb-bound books.
- Page numbering: Generally, odd-numbered pages should be on the right when reading a booklet, and even-numbered pages should be on the left. Please keep this in mind when creating your book.
- We can add page numbers if you would like us to.
- Rotation: In a portrait-style booklet, landscape pages should be rotated counterclockwise.
- Stapled booklets: Stapled booklets require a number of pages that is divisible by four. We can often add a few blank pages at the end to make it work, but please be aware of how this might impact page sequencing or numbering.
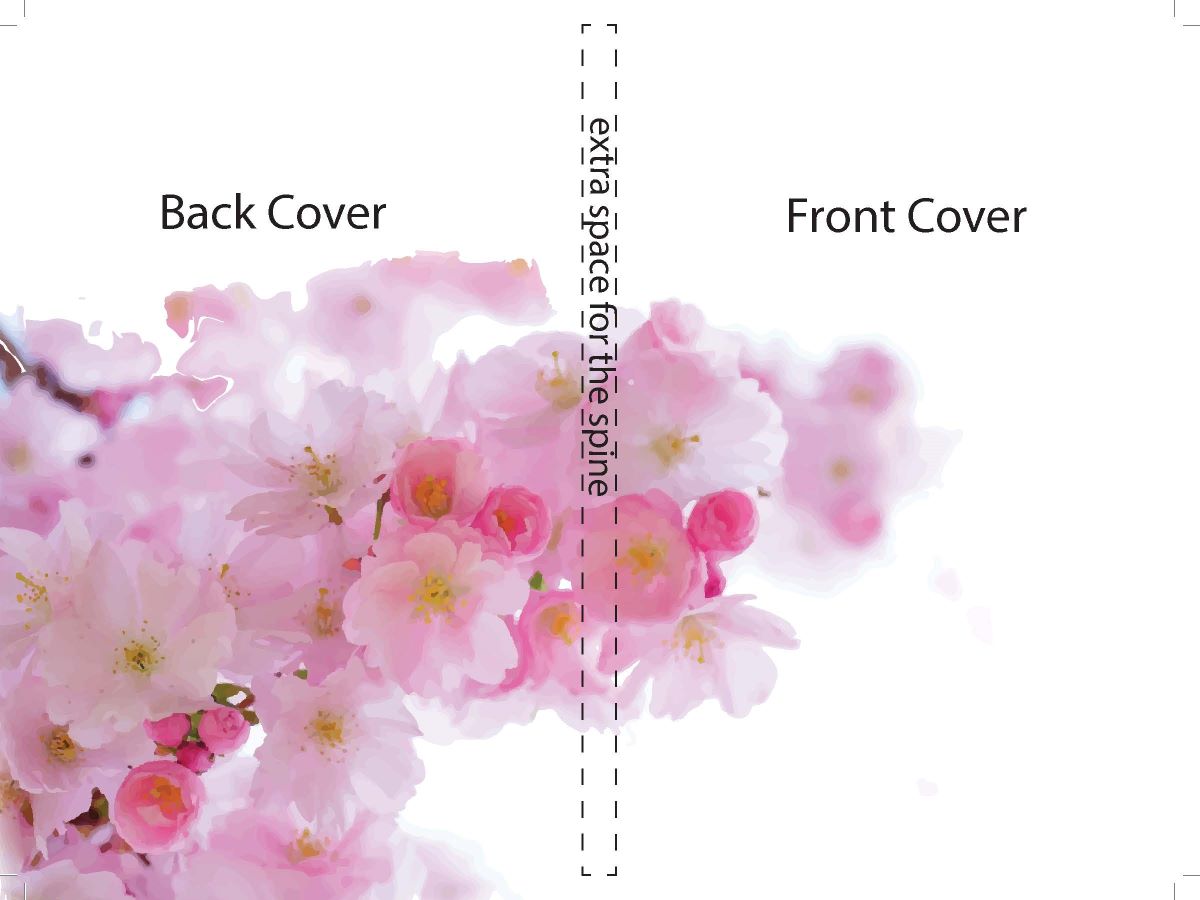
- Perfect bound booklets (glue binding): (Please be aware that this binding takes significantly longer than the other types, so plan ahead if you have a deadline.) Send the inside pages like normal, but if you have any content on your cover that you want to go over the spine, send your cover as a full spread. When creating a full-spread cover make sure to take into account the thickness of the spine. If you have this sort of cover and want something printed on the inside of the covers, include that as a spread as well. Below is an example of what the spread for the front and back cover of a perfect bound book would look like:
Brochures (trifolded documents)
- Sizing/Layout: Sizing and spacing are very important for brochures. Please be sure that each panel of your file is sized correctly and laid out appropriately so that the folds end up in the right place and that each panel's content is centered.
- Bleed: Bleed content and trim marks are especially important for brochures that have content going off the edge. We cannot easily cut into or add white borders to such brochures because changing the size of the content or the size of the end product alters the fold lines. See bleed section above for more information.
Business Cards
- Weight/bleed: We print business cards on 100# cardstock (our heaviest cardstock). Please include bleed if applicable (see bleed section above for more information).
- Calvin Faculty/staff:
- Stock: Calvin business cards are printed on Environment 100# cardstock.
- Content: We can create business cards for Calvin employees if they provide the necessary information. To help the printing process be cheaper and more efficient, you can create the business card file yourself, using this form found on Communications and Marketing's webpage (alternatively, go to C&M's page, scroll down a little and click "Calvin Stationary," login with your credentials, and click "customize" to the right of "Business Card"). Login with your credentials, fill out your information, click "Update" on the right, and then "View PDF." Save the PDF and send it to us as an attachment on your email order form.
- The "add to cart" button at the bottom of the form is not for Printing Services. Ordering business cards using the "add to cart" button orders them through the online store. Printing Services is cheaper than the online store for up to 500 cards.
- Back of card: Calvin employees have the choice between having the heart-in-hand logo on the back of the card or the wayfinder. Please let us know which you would prefer when you send in your order form.
Envelopes
- Layout: Please have a PDF of your content sized to the envelope size you desire. If you want printing on the back flap, have that content as another page on your PDF.
- Addresses: It is usually best if you format the return address yourself, if you want it. Otherwise, we can add it if you give us the address and the font type and size. We can print individual recipient addresses on your envelopes as well - see Variable Data section below.
- Calvin Faculty/staff:
- Stock: Calvin envelopes are printed on Environment stock envelopes
- Content: We can create envelopes with a Calvin return address and logo for Calvin departments if they provide the necessary information (department name and envelope size). To help the printing process be cheaper and more efficient, you can create the envelope file yourself, using this form found on Communications and Marketing's webpage (alternatively, go to C&M's page, scroll down a little and click "Calvin Stationary," login with your credentials, and click "customize" to the right of "#10 Envelope.") Choose your department from the dropdown list, click "Update" on the right, and then "View PDF." Save the PDF and send it to us as an attachment on your email order form.
- If you need a different-sized envelope with the return address, it still helps to send us the PDF of the #10 with your return address. Please just let us know that you want that information transferred to an envelope of a different size.
- The "add to cart" button at the bottom of the form is not for Printing Services. Ordering envelopes using the "add to cart" button orders them through the online store. Printing Services is cheaper than the online store for up to 2,000 envelopes.
Posters
- Cardstock (poster stock): If a print request seems to be for a poster, we will often print it on 80# cardstock automatically. However, please specify if you want it on cardstock or not so that things are clear and you get what you want the first time.
- Bleed: If you have content/color running off the edge of your poster, please include bleed (see bleed section above) or let us know if a white border is okay.
Variable Data
*Note: Please make sure there are no unintentional spaces in any of the cells of your spreadsheet.- For addresses (on envelopes/postcards/other documents or for address labels): Send us an excel file separated into columns by
- First Name
- Last Name
- Street Address
- When necessary, separate the street address into columns for "Address Line 1", "Address Line 2" etc.
- City
- State
- Zip Code
- Country, if outside of the US
- Please group international addresses together.
- For names and other content: Send us an excel file with each piece of data in its own column (eg. First Name, Last Name, Department, Title, Company, etc.) and give us a description of how you want it laid out (eg. First and Last Name on one line, Company on second line below, centered...). Please provide headers for each column. Let us know if you have font size/type preferences.
- If you have variable images: Make an image column in your spreadsheet, and type the name of the image into the cell in the data row in which it is applicable. Do not include the file extension (".jpg", ".png", etc.). Attach the corresponding images to your email.
- For example, if you were making table cards with names and an image that corresponded to meal choice, make columns in your spreadsheet for first name, last name, and meal choice. One row might say "Bo Ah" under the first name column, "Jung" under last name, and "beef" under meal choice. Attached to the email to Printing Services could be an image of a cow named "beef".